Set up reliable email with Mailgun
The complete walkthrough: every screen, every field, from account creation to inbox confirmation.
yourdomain.com), login access to wherever your domain’s DNS is managed (Cloudflare, IONOS, GoDaddy, Namecheap …), and your PageMotor or WordPress admin login for the final step.
1Create your Mailgun account
Sign up at mailgun.com. The free plan needs no credit card. You’ll be asked to verify your email address before you can do anything else — do that before continuing.
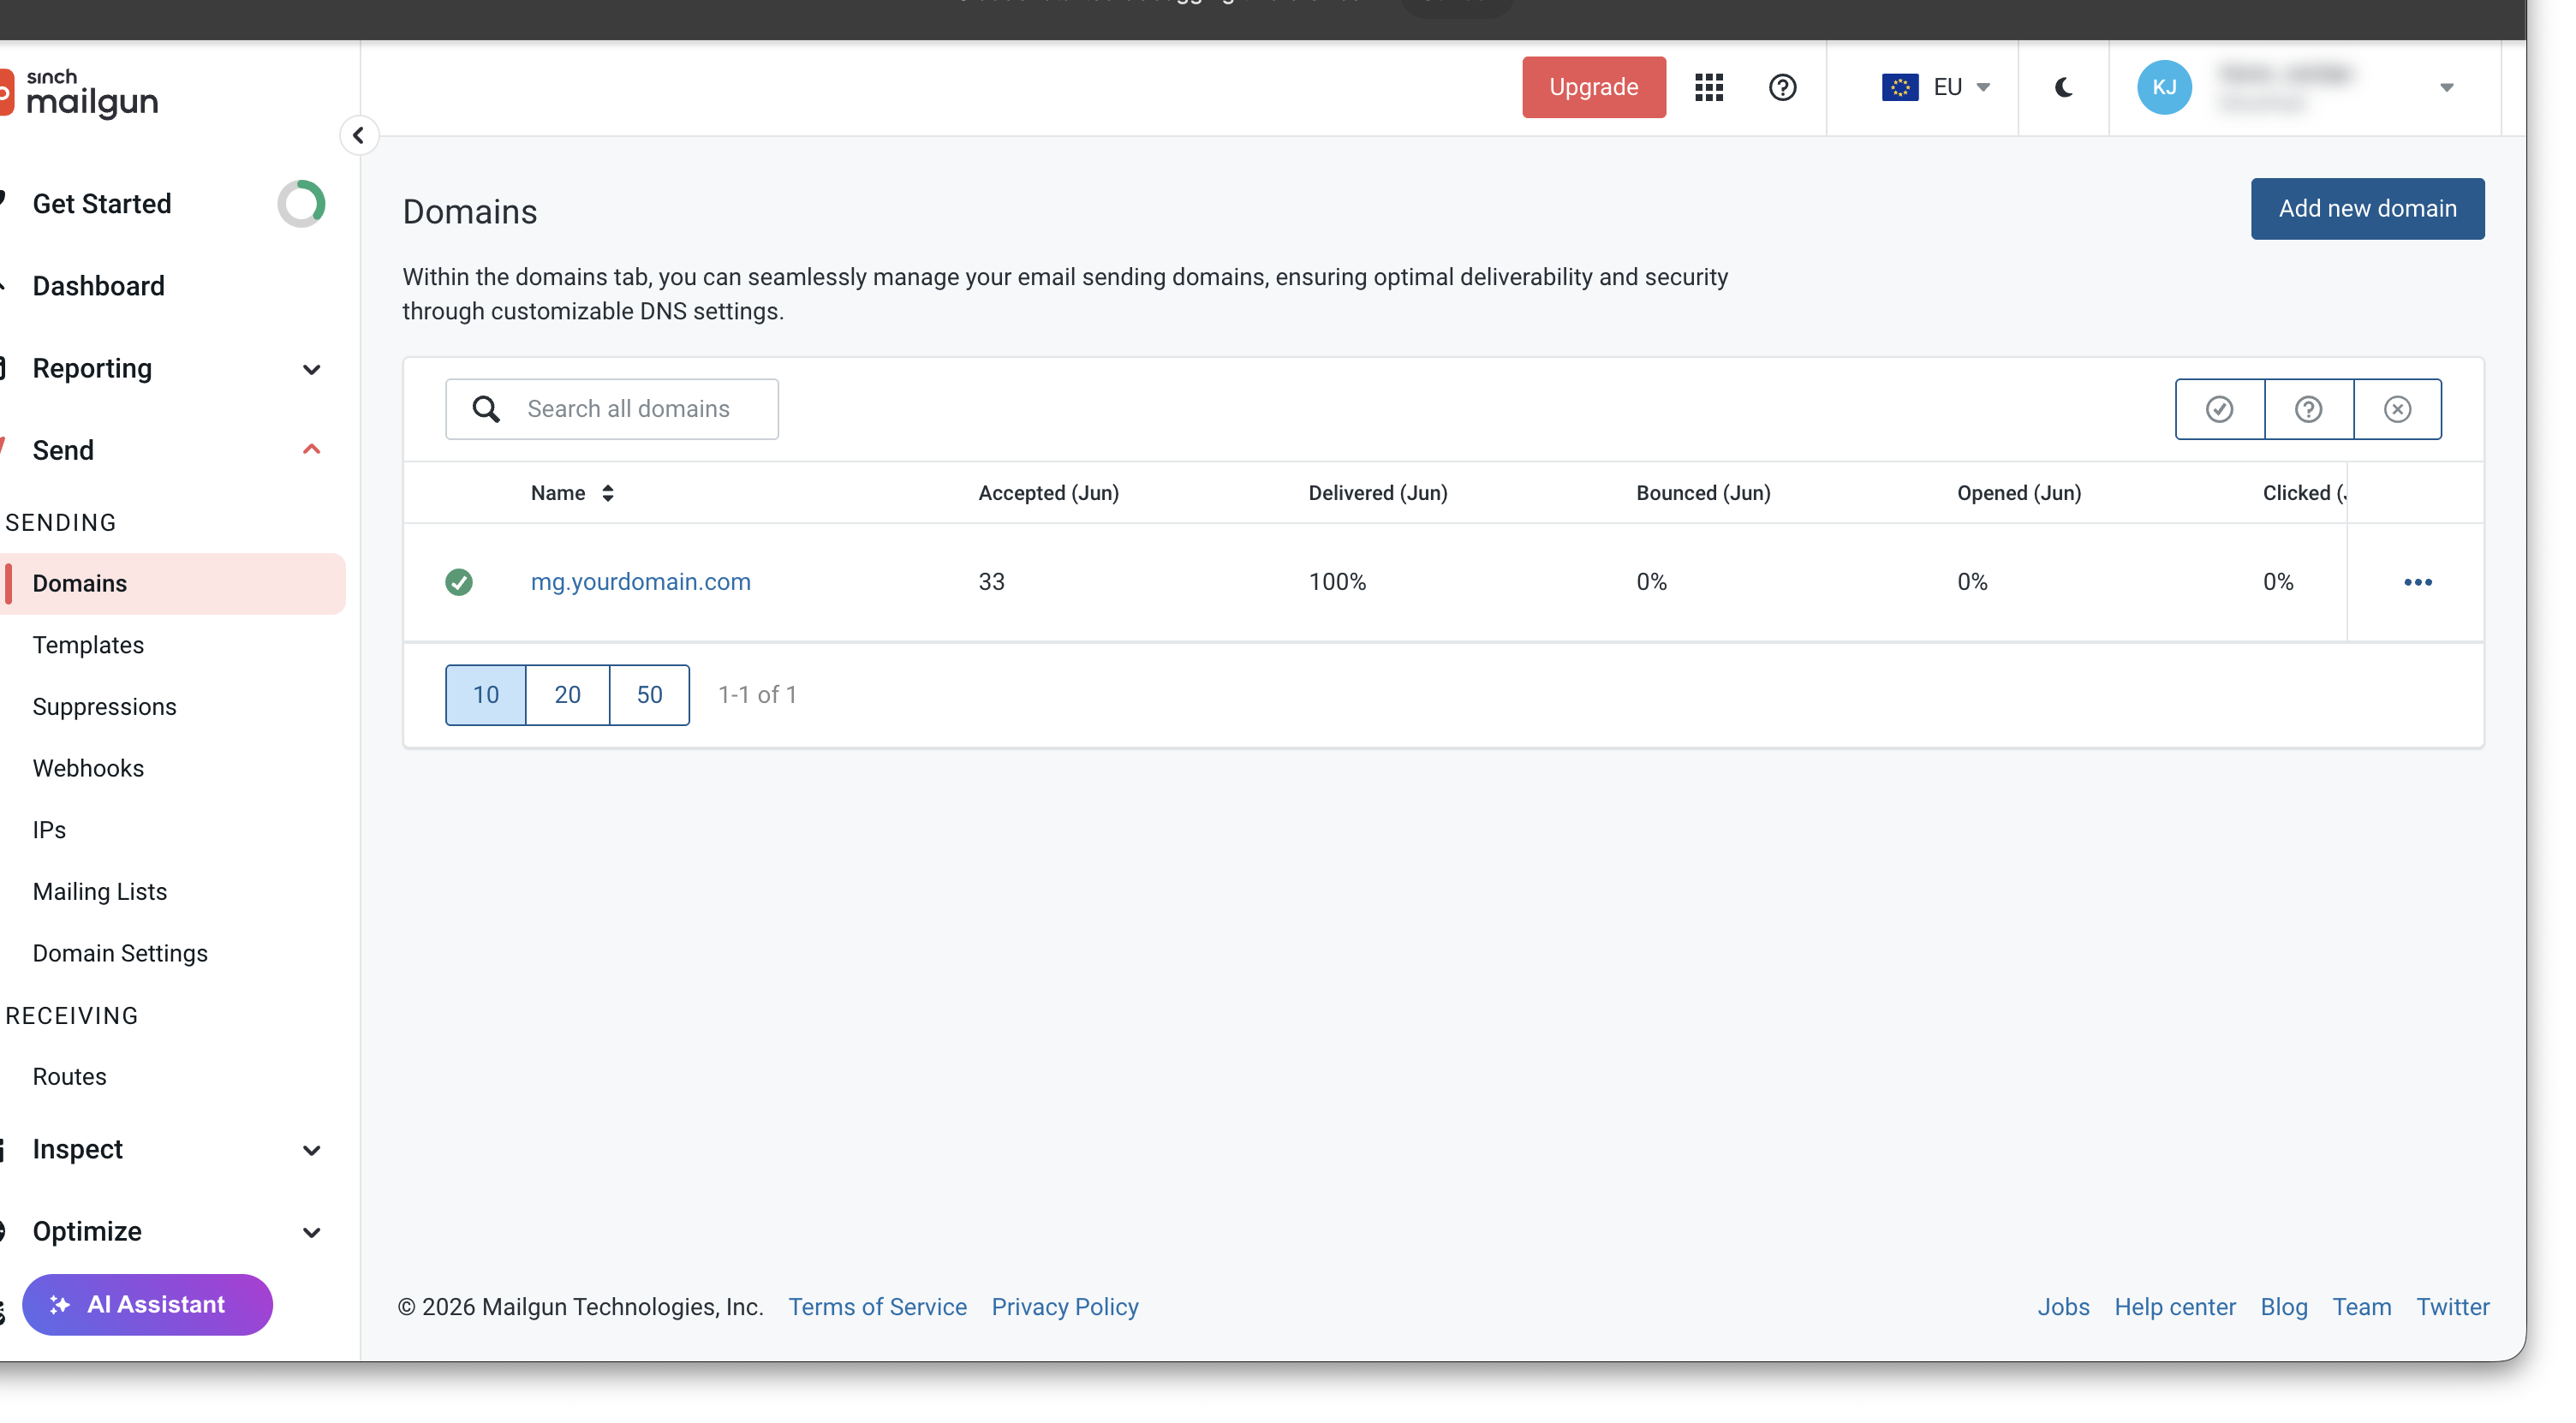
2Add your sending domain
Once logged in, you land on the dashboard. Navigate to Send → Sending → Domains in the left sidebar. Your account starts with a sandbox domain — ignore that. You want to add your own domain.
On the Domains page, click Add new domain.
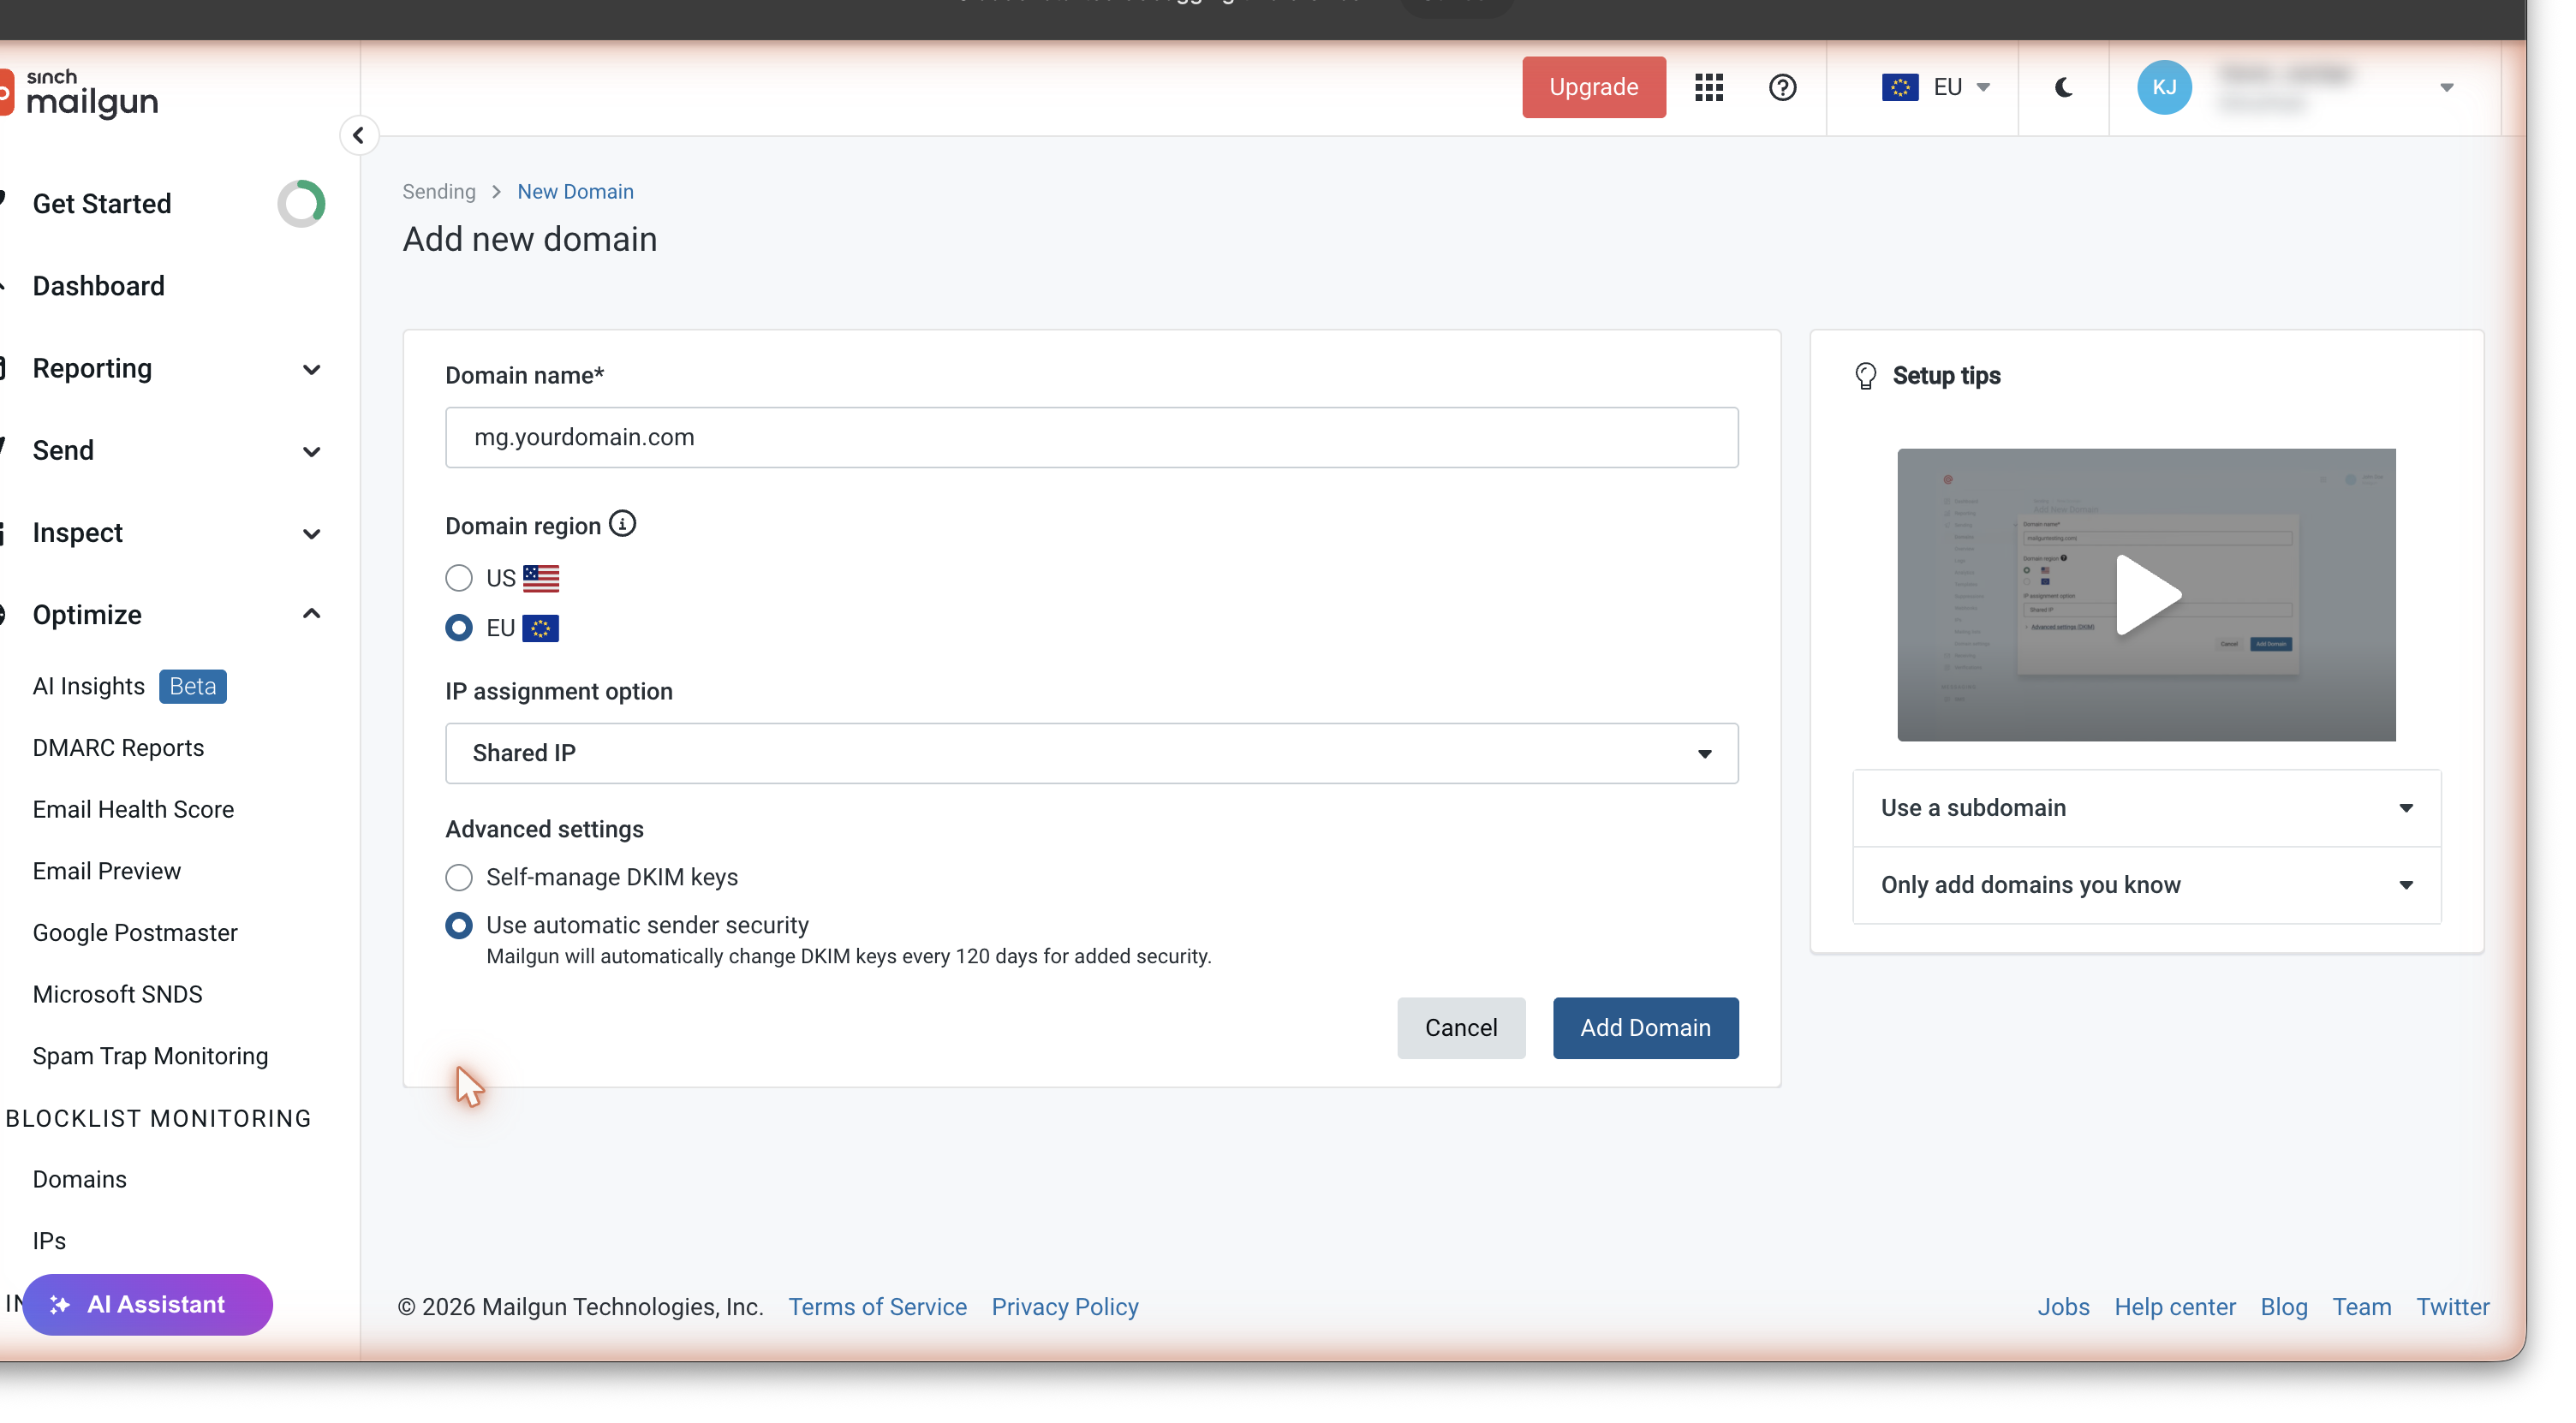
The Add Domain form opens. This form has four sections and one of them has a choice that will determine which DNS records you’ll need to add. Read every field below before you fill anything in.
Field by field — what to enter
| Field | What to enter and why |
|---|---|
| Domain name |
Enter mg.yourdomain.com — your real domain with mg. in front. For example: mg.example.com.
The |
| Domain region |
EU — if you or your audience are in the UK or Europe US — if your audience is in North America This must match the region you chose when you signed up. It is locked per domain for life. |
| IP type |
Shared IP
Dedicated IPs are for high-volume senders (50,000+ emails/month). Leave this on Shared unless you specifically need otherwise. |
| Security settings ← READ THIS |
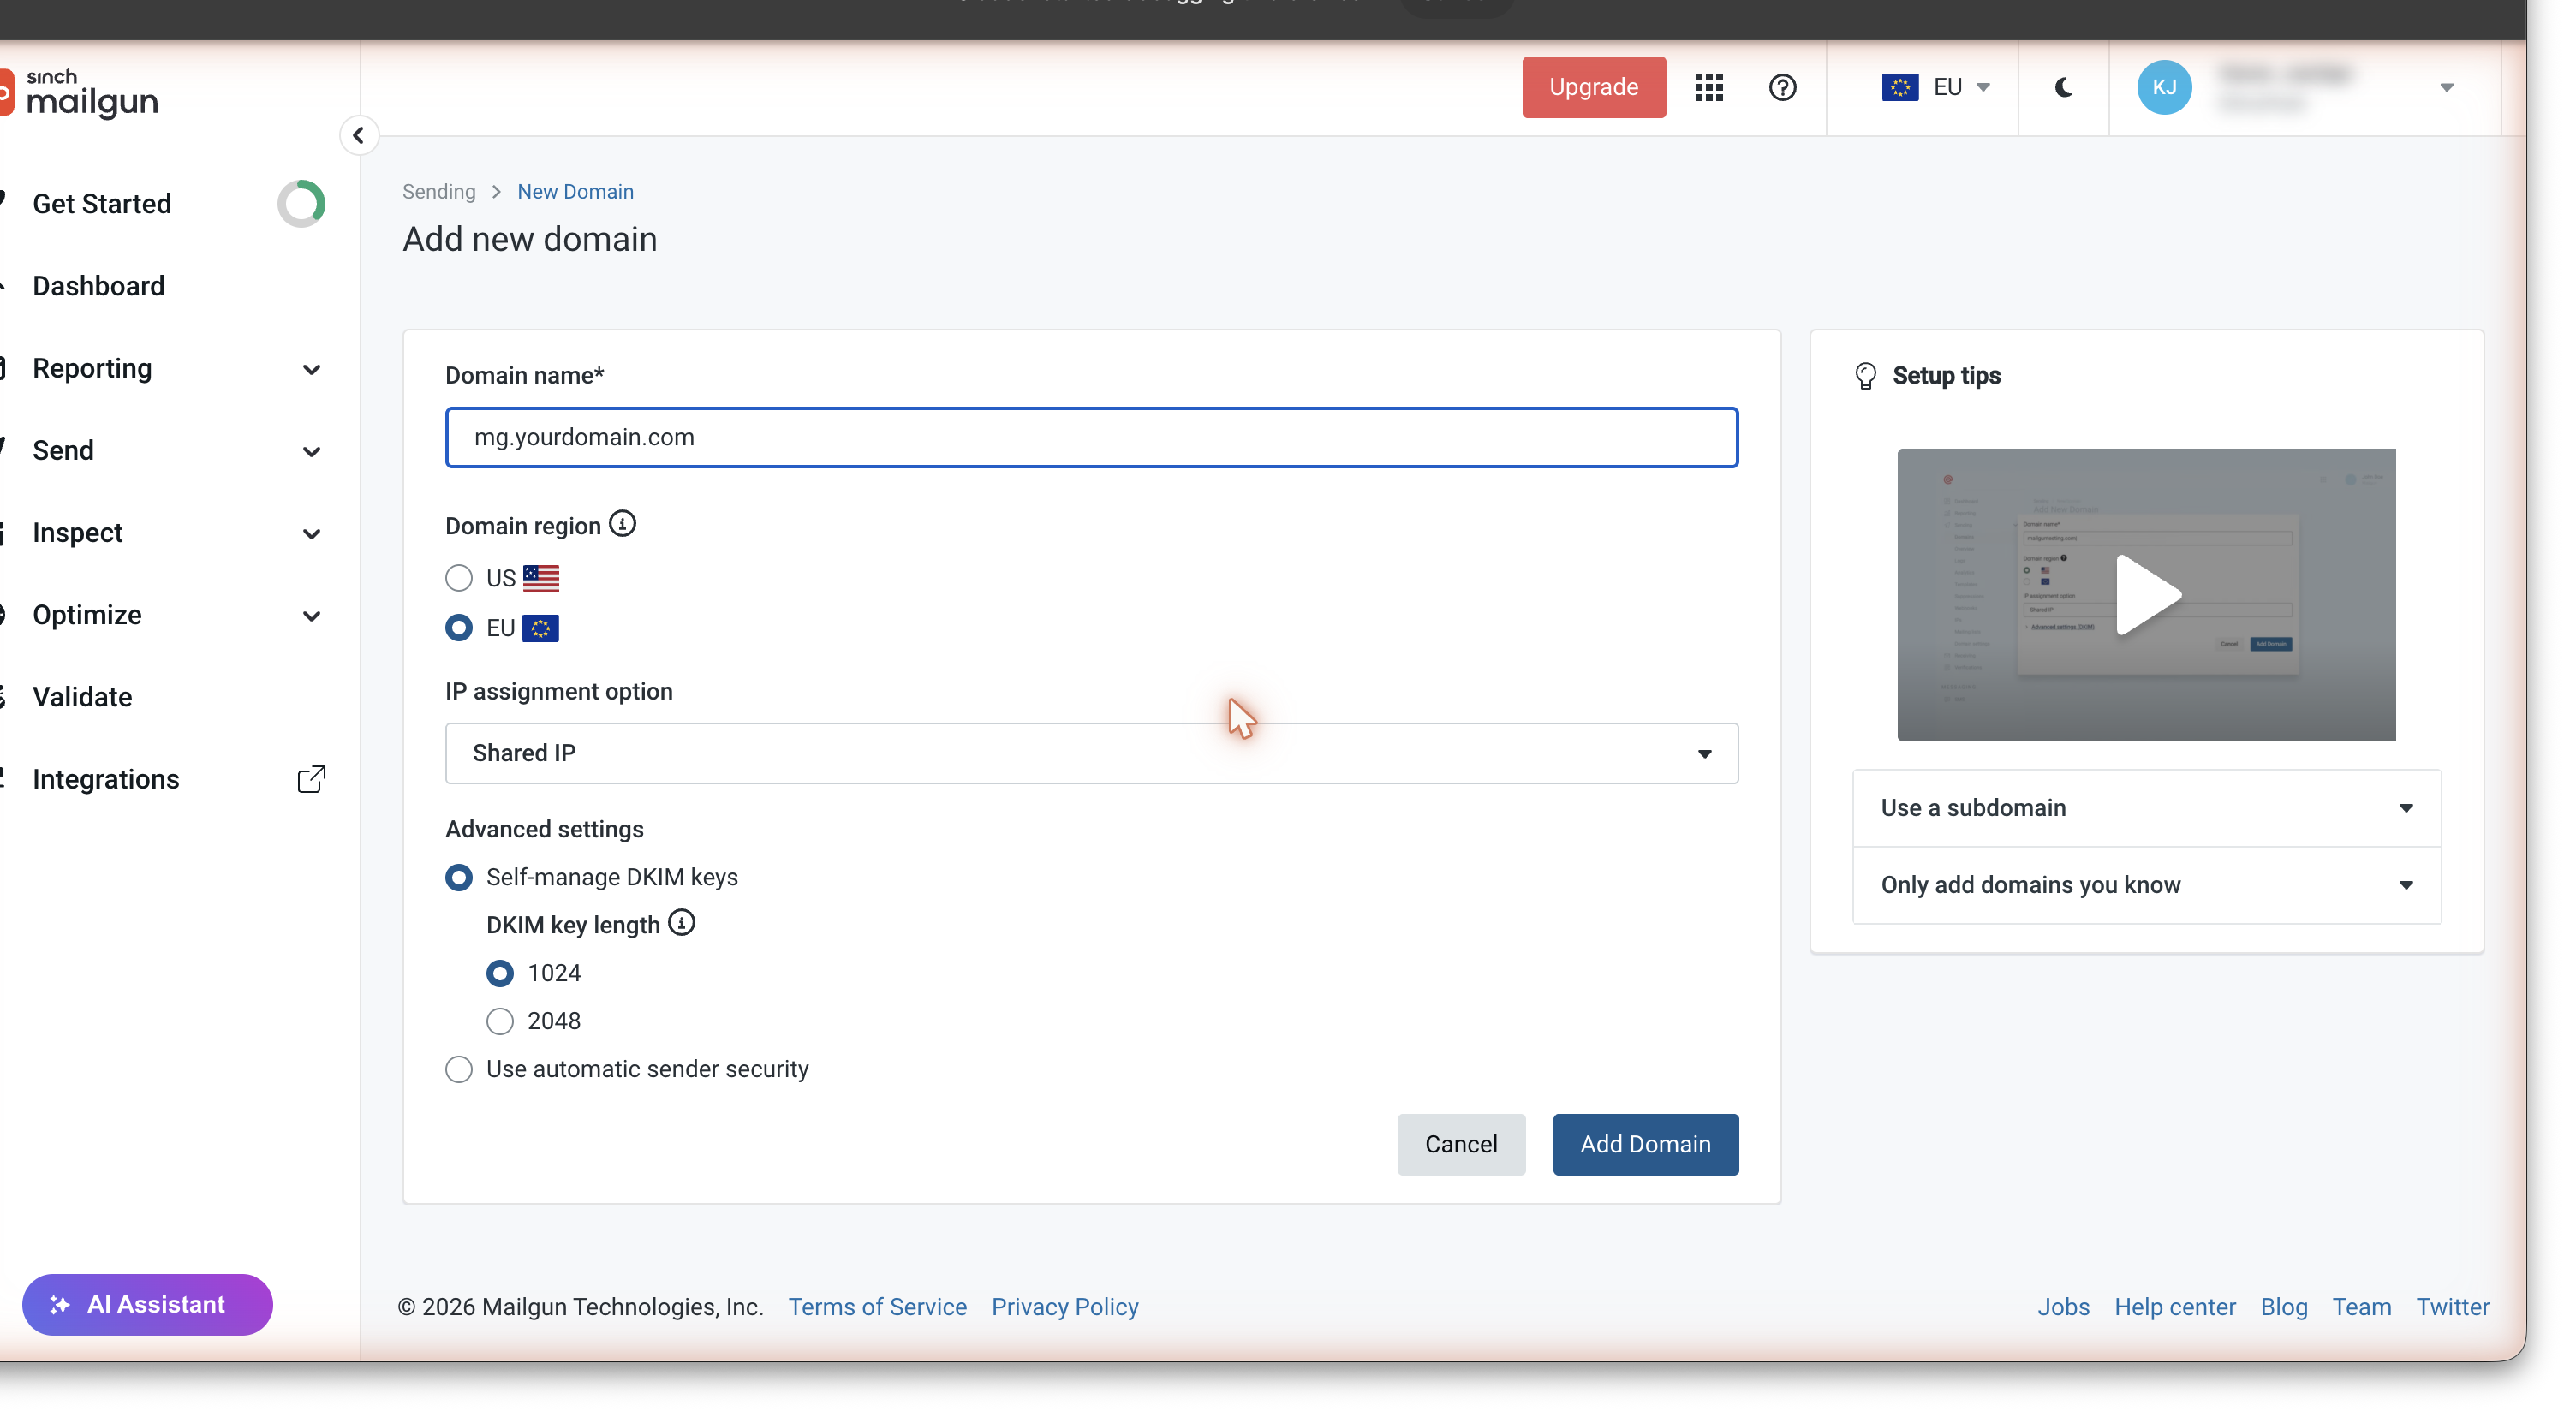
Use automatic sender security Self-manage DKIM keys |
| DMARC / Red Sift |
Leave unticked
You will enable DMARC properly in Step 7. Skipping this checkbox here is intentional. |
- Mailgun manages and rotates your DKIM signing keys automatically
- Better long-term deliverability with no maintenance
- Gives you 2 CNAME records (pdk1 and pdk2) to add to DNS
- This guide’s DNS records table matches this option
- You get a static 1024-bit key you must rotate yourself manually
- Gives you 1 TXT record instead of 2 CNAMEs — a completely different DNS record set
- If you pick this, the DNS records in Step 3 will not match what Mailgun shows you — you will need to start over
If you already added the domain with the wrong option: delete the domain in Mailgun (Domain Settings → Delete Domain), then add it again with “Use automatic sender security” selected.
Once you have filled in all fields correctly, click Add Domain. Mailgun will take a few seconds to create the domain and then show you the DNS records screen.
3Copy the DNS records
After clicking Add Domain, you land on the DNS records screen. This shows every record you need to add to your domain’s DNS. Do not close this page.
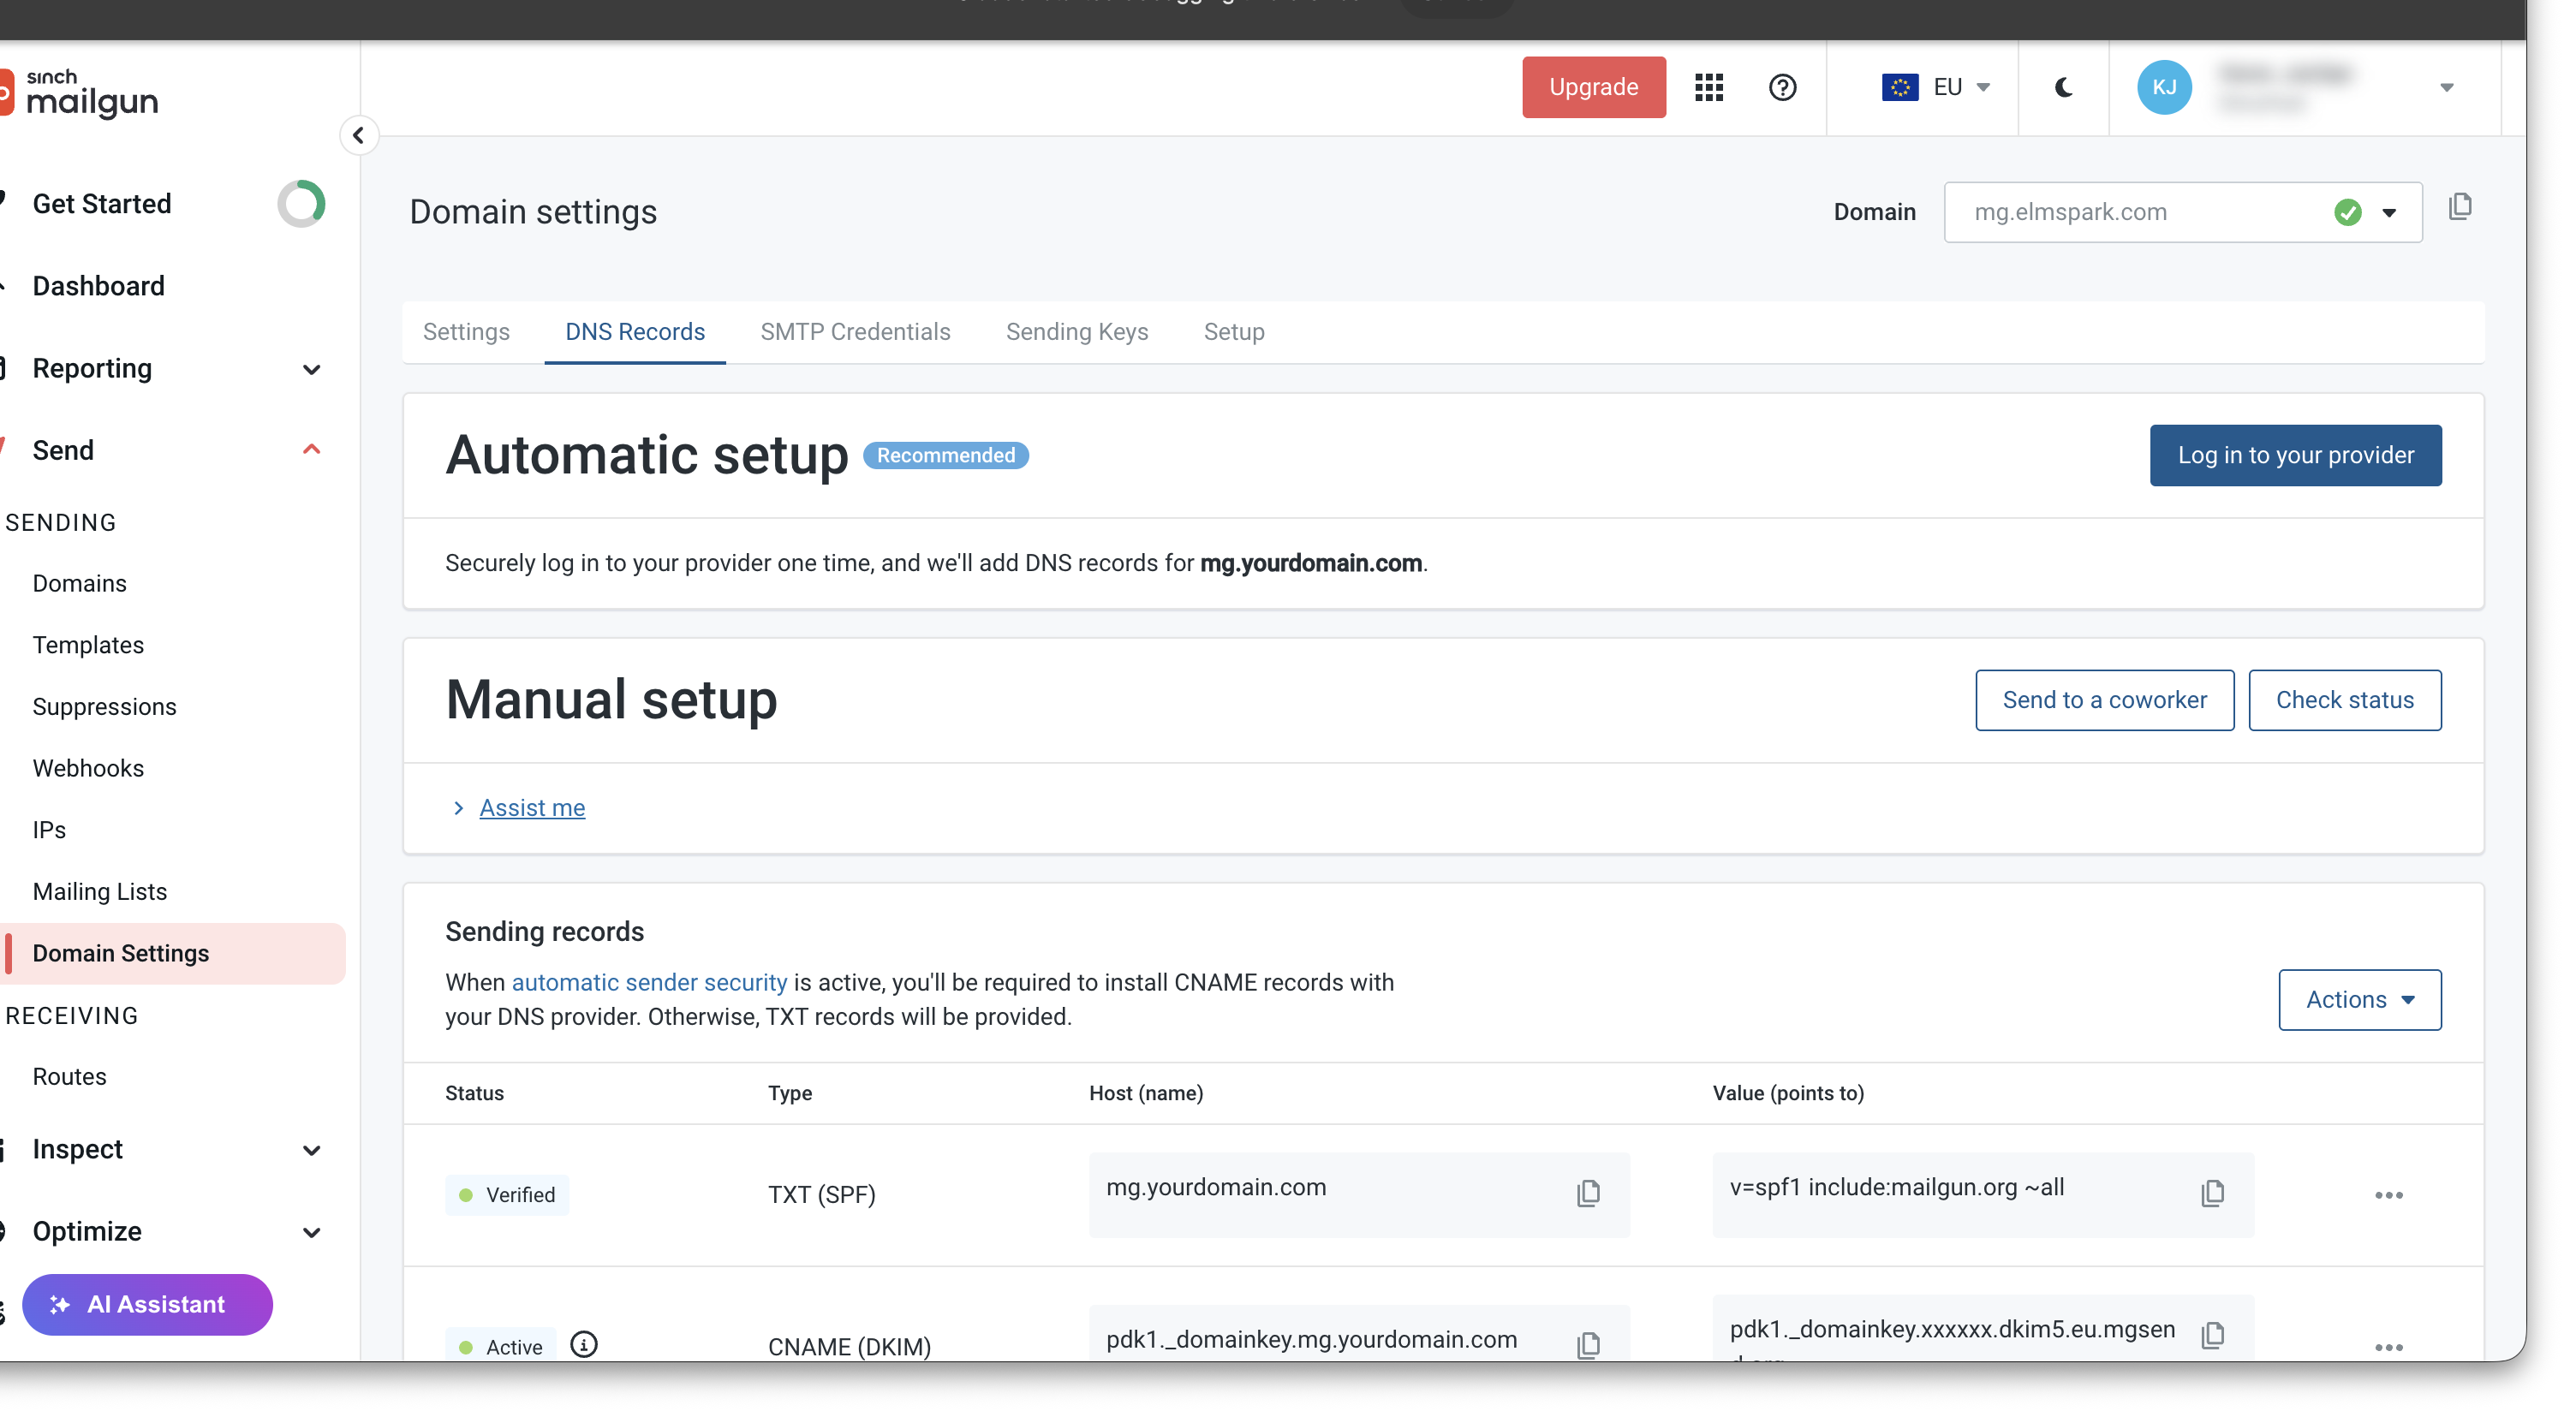
If you chose “Use automatic sender security” in Step 2, you will see 7 records: one SPF, two DKIM CNAMEs, one tracking CNAME, and two MX records. Here is what each one does:
| Type | Name / Host | Value | Purpose |
|---|---|---|---|
| TXT | mg.yourdomain.com |
v=spf1 include:mailgun.org ~all |
SPF — declares Mailgun is allowed to send for this domain |
| CNAME | pdk1._domainkey.mg.yourdomain.com |
pdk1._domainkey.<hash>.dkim5.eu.mgsend.org |
DKIM key 1 — cryptographic signature (copy exact value from Mailgun) |
| CNAME | pdk2._domainkey.mg.yourdomain.com |
pdk2._domainkey.<hash>.dkim5.eu.mgsend.org |
DKIM key 2 — second rotation key (copy exact value from Mailgun) |
| CNAME | email.mg.yourdomain.com |
eu.mailgun.org |
Tracking — enables open/click tracking (optional but recommended) |
| MX | mg.yourdomain.com |
mxa.eu.mailgun.org (priority 10) |
Bounce handling — lets Mailgun receive delivery failures |
| MX | mg.yourdomain.com |
mxb.eu.mailgun.org (priority 10) |
Bounce handling (second, redundant) |
eu.mailgun.org with mailgun.org and eu.mgsend.org with mgsend.org in the values above. The Mailgun screen will show the correct values automatically — always copy from there rather than typing manually.
<hash> part is not derivable from your domain name. Copy the values exactly from the Mailgun screen — do not type them or try to construct them.
4Add the records at your DNS provider
Open your DNS provider in a separate tab and add each of the 7 records. Keep the Mailgun DNS screen open for reference.
mg.yourdomain.com, edit the existing one rather than adding a second. Multiple SPF or DMARC records cause authentication to fail for everything.
Adding records on Cloudflare
- Log in to Cloudflare → pick your domain → go to DNS → Records.
- Click Add record for each of the 7 records.
- Critical: set every record to DNS Only (grey cloud, not orange). The Cloudflare proxy (orange cloud) breaks email authentication. Click the orange cloud icon to toggle it to grey before saving each record.
- For MX records: enter just the hostname in the Priority box (e.g.
10) and the mail server address in the Content box. - For CNAME records: paste the full value Mailgun gives you including the trailing dot if one appears.
Adding records on IONOS
- Log in to IONOS → go to Domains & SSL → click your domain → DNS.
- Add each record using the Add Record button.
- For CNAME records, enter the subdomain part only in the Host field (e.g.
pdk1._domainkey.mgnot the fullpdk1._domainkey.mg.yourdomain.com). - IONOS may take up to 30 minutes to propagate changes.
Adding records on GoDaddy
- Log in to GoDaddy → My Products → DNS → click your domain.
- Add each record. GoDaddy expects CNAME values without a trailing dot.
- For the Host field on GoDaddy, enter only the subdomain portion, not the full domain.
Adding records on Namecheap
- Log in to Namecheap → Domain List → Manage → Advanced DNS.
- Add each record. For the Host field, enter only the subdomain portion.
Mailgun’s automatic setup (easiest if your provider is supported)
On the DNS records screen in Mailgun, look for the Automatic setup card at the top. It reads “Log in to your provider”. Mailgun supports Cloudflare, GoDaddy, Bluehost, and others. If your provider appears in the list, click it and follow the authorisation flow — Mailgun adds every record for you in one step and you can skip the manual steps above entirely.
5Verify the domain in Mailgun
Once all records are added at your DNS provider, return to Mailgun and click Check Status (or Verify DNS Settings) on the DNS records page. Each record should change from a red cross to a green tick.
6Wait for DKIM activation
This step catches people out. Even after all DNS records show as “Verified” in Mailgun’s interface, sending may not work yet. Mailgun needs to activate the DKIM signing keys on its own servers, and it does this asynchronously after the CNAMEs validate. It typically takes 30 seconds to 10 minutes.
On the domain settings page, you may see a yellow warning like “Unverified domain settings” even though all records are green. That warning clears automatically once DKIM is fully active. Refresh the page every few minutes until the warning disappears.
7Enable DMARC
DMARC (Domain-based Message Authentication, Reporting and Conformance) tells receiving mail servers what to do with messages that fail authentication, and where to send reports. You want this configured before you send any real email.
In your Mailgun domain settings, scroll to the Authentication records section near the bottom and click Enable DMARC. Mailgun generates a TXT record value for you.
Copy the TXT record value Mailgun gives you. It will look something like:
v=DMARC1; p=none; pct=100; fo=1; ri=3600; rua=mailto:…@dmarc.mailgun.org; ruf=mailto:…@dmarc.mailgun.org;
Go back to your DNS provider and add a new TXT record:
- Name / Host:
_dmarc.mg.yourdomain.com - Value: the full string Mailgun gave you
Then return to Mailgun and click Check Status again. The DMARC row should turn green.
p=none policy in the DMARC record is intentional — it starts in report-only mode. This is correct. Do not change it to p=reject or p=quarantine until you have been sending successfully for several weeks and have reviewed the reports.
8Create a sending key
The sending key is the credential that lets your site actually send email through Mailgun. It is scoped to this specific domain, which means even if it were ever compromised it could only be used to send from your one domain.
In your Mailgun domain settings, click the Sending keys tab, then Add sending key.
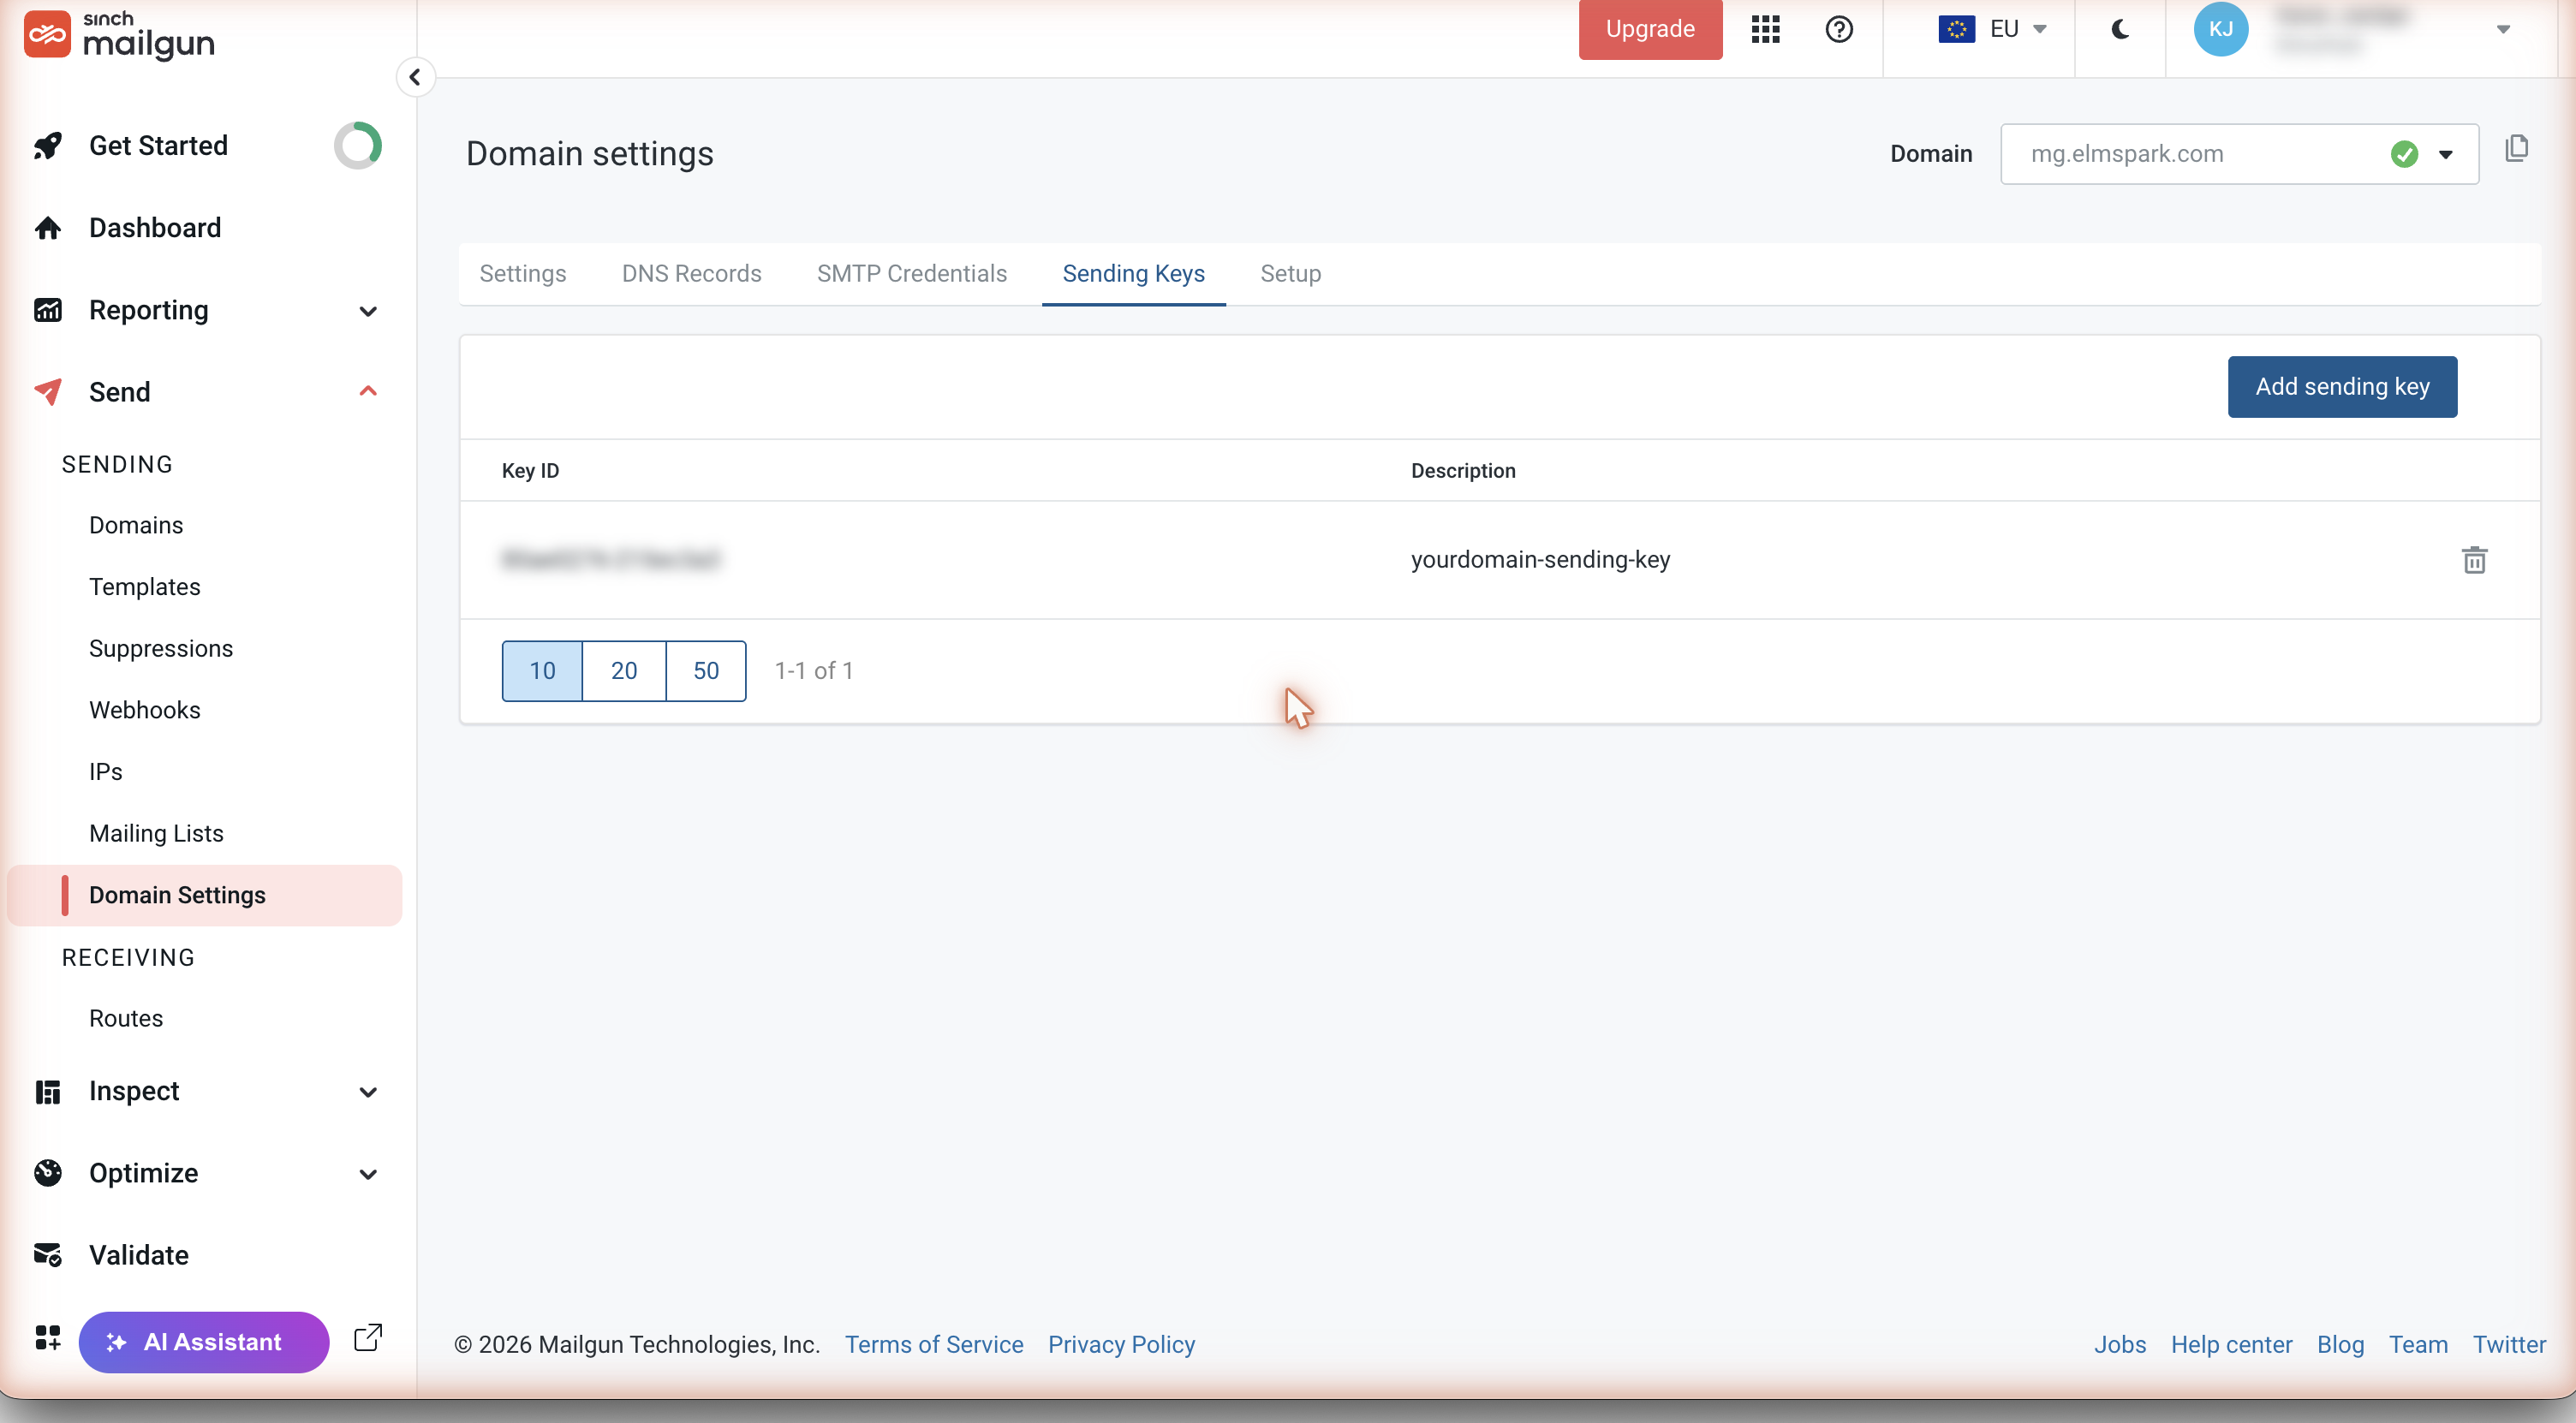
- Give it a memorable name, for example
pagemotor-site. - Click Create sending key.
- Copy the key the moment it appears. Mailgun shows it exactly once. If you miss it, you have to delete the key and create a new one.
9Connect your site
PageMotor — EP Suite plugins
You need two plugins: ep-email-mailgun (handles transactional email: contact forms, password resets) and ep-newsletter-mailgun (handles newsletter campaigns). Install both even if you do not plan to use newsletters right away.
- In PageMotor admin, go to Plugins → Manage Plugins → Upload.
- Upload
ep-email-mailgun.zip. Activate it. - Upload
ep-newsletter-mailgun.zip. Activate it. - Open each plugin’s settings and fill in:
- Sending Key — the key you copied in Step 8
- Sending Domain —
mg.yourdomain.com - Region — EU or US, matching what you chose in Step 1
- Click Test Connection. It should turn green.
- In EP Email → SMTP Configuration, set the transport to Mailgun.
- In EP Newsletter → Email Delivery, set the driver to Mailgun. Also make sure ep-newsletter-mailgun appears before ep-newsletter in the plugin load order — otherwise the newsletter driver will not be picked up.
WordPress — Mailgun official plugin (recommended for most users)
- In WordPress admin, go to Plugins → Add New and search for “Mailgun”. Install the official plugin by Mailgun.
- Activate it, then go to Settings → Mailgun.
- Fill in: Region, Domain Name (
mg.yourdomain.com), API Key (from Step 8), From Address, From Name. - Set Use API to Yes.
- Save, then click Test Configuration.
WordPress — Gravity SMTP (if you have a Gravity Forms licence)
- Download Gravity SMTP from your Gravity Forms account and install it in WordPress.
- Go to Gravity SMTP → Settings → Integrations and add Mailgun.
- Use the account-level Private API key from Mailgun Settings → API Security (not the domain-scoped sending key).
- Fill in the sending domain, region, and From address.
- Save and set Mailgun as the Primary integration.
10Test it really works
Mailgun saying “domain active” and the plugin saying “connection successful” only mean the credentials are valid. They do not prove a single email will land in an inbox. This step is the only thing that does.
Send a real test email. Use the plugin’s test button or fill in and submit a real contact form on your site. Address it to a Gmail inbox you can open.
Check the email lands in Inbox, not Spam. Open Gmail. If the email went to Spam, it is not set up correctly yet. If it landed in Inbox with no “Be careful with this message” warning, you are close.
Run a mail-tester check. Go to mail-tester.com, copy the one-off address it gives you, and send it a real test email through your site. Then click “Then check your score”. Aim for 9 or 10 out of 10. Any lower and mail-tester will tell you exactly what is still misconfigured.
Check the Mailgun event log. In Mailgun, go to Reporting → Logs. Find your test message. It should show: Accepted then Delivered. SMTP code 250. If it shows “Failed” or “Rejected”, there is still a configuration problem.
Troubleshooting
Open these only if you hit them.
My test email lands in Spam
Usually it means DKIM is not fully active yet (Step 6). Wait a few more minutes and resend. Also: make sure your From address uses your own domain, not a free address like gmail.com. Run a mail-tester.com check — it will name whatever specific thing is still missing.
Mailgun shows “Verified” but sending fails
After records verify, Mailgun still needs a few minutes to activate the DKIM keys on its own servers. The domain overview page may show a yellow “Unverified domain settings” warning even though all DNS rows are green. This is the DKIM activation lag described in Step 6. Wait and refresh.
I see only 1 TXT-based DKIM record, not 2 CNAMEs
You chose “Self-manage DKIM keys” in Step 2 instead of “Use automatic sender security”. This guide’s DNS records table does not match that mode. The fix: go to Domain Settings → delete the domain, then add it again with the correct option selected. The 1-TXT mode does work technically, but it means different DNS records to add.
Duplicate SPF or DMARC warning
There can only be one SPF record and one DMARC record per DNS name. Edit the existing record rather than adding a second one. This guide uses a subdomain (mg.) which means you should never clash with records on the apex domain, but if you added the records to the wrong place it can happen.
Cloudflare records show as verified but mail still fails
Most likely the Cloudflare proxy is still on for one or more records (the orange cloud icon). All email-related DNS records must be DNS only (grey cloud). Click the orange cloud for each Mailgun record in Cloudflare and toggle it to grey, then click Save.
I chose the wrong region during signup
The region is locked per domain for life. Your options are: (a) if you have not sent any email yet, delete the domain, delete the Mailgun account, and create a new one with the correct region; or (b) create a second Mailgun account in the correct region and use that for the domain going forward. You cannot move an existing verified domain between regions.
I am on WordPress with Gravity SMTP and it says “invalid API key”
Gravity SMTP does not accept domain-scoped sending keys (the kind created in Step 8). You must use Mailgun’s account-level Private API key instead. In Mailgun, go to the main Settings menu (top-level, not Domain Settings), then API Security, and copy the Private API key from there.
Mailgun’s “Send to a Coworker” email is missing the pdk1 / pdk2 CNAME rows
This is a known issue with Mailgun’s setup email template when using “automatic sender security” mode. The email shows 5 records but your domain needs 7. The two missing pdk1 and pdk2 CNAME records are real and required — they are just missing from the email template. Get the correct values by logging in to Mailgun and reading them directly from the DNS records screen. Do not use the coworker email as your source of truth.